
Roof Leaks: Why the Stain on Your Ceiling Is Almost Never Where the Water Got In
Water enters a roof at one point, travels along the underside of the deck or down a truss, and drops through your ceiling somewhere else entirely. Repair the stain and you have repaired nothing. This is how a leak is actually traced — and how to tell a real repair from a smear of sealant.
A practical guide for South Florida homeowners: the seven places leaks genuinely start, what a proper repair includes, when a repair stops being the right answer, and the questions that separate a roofer from someone with a caulk gun.
- ·Why water travels before it drips
- ·The seven places leaks start
- ·What fails on tile, shingle & metal
- ·How a leak is properly traced
- ·What a real repair includes
- ·How to spot a patch job
- ·A real repair, photographed
- ·When repair stops being the answer
- ·The damage you cannot see
- ·What to do right now, today
- ·FAQs
Why Water Travels Before It Drips
A roof is not a flat lid. Underneath the tile or shingle there is a sloped plywood deck, and under that a framework of trusses. Water that gets past the surface does not fall straight down — it runs along the slope of the deck, across the top of a truss, or down the side of one, until it meets an obstruction or an opening.
That is why the ceiling stain in your hallway can be caused by a cracked tile ten or fifteen feet away, on a completely different part of the roof. It is also why the single most common mistake in roof repair — sealing the area directly above the stain — reliably fails. The water was never coming in there.
Tracing a leak means working backwards, uphill, from the visible damage to the actual entry point. It takes an attic inspection, a look at the roof surface, and sometimes a controlled water test. It takes longer than a patch. It is also the only version of this work that lasts.
The Seven Places Leaks Genuinely Start
Roofs almost never fail in the middle of an open slope. They fail where something interrupts the surface — a pipe, a wall, a change of direction, an edge. Learn these seven and you know where to look.
Pipe boots and vent seals
The rubber collar around every plumbing vent degrades in Florida UV within ten to fifteen years — long before the tile above it. It is the leading cause of leaks on otherwise healthy roofs, and it is a same-day fix.
Valleys
Two slopes draining into one channel. Debris packs in, water backs up over the edge of the valley metal, and corroded or undersized valley metal lets it straight through.
Wall and counter flashing
Where a roof runs into a vertical wall — a second storey, a chimney, a chase. If the flashing was reused on the last re-roof, or replaced with sealant, this is where your leak is.
Lanai and low-slope sections
The membrane over a lanai, bay, or entry projection has a shorter life than the tile beside it and is the most commonly skipped part of a roof. If a leak does not match the weather, look here.
Cracked, slipped, or missing tile
A wind event or careless foot traffic cracks tile and exposes the underlayment beneath. The roof may not leak for a year — then the underlayment gives up at that exact spot.
Drip edge, fascia, and rake
Wind-driven rain gets under an edge with no drip metal or a rotted fascia board behind it. Common on older homes and almost always misdiagnosed as a gutter problem.
Skylights, solar, and satellite mounts
Anything fastened through a roof after it was built is a hole with a seal around it. Skylight curbs and solar stanchion flashings are frequent offenders, and satellite installers crack more tile than storms do.
What Fails on Tile, Shingle, Metal and Flat
The same leak has a different cause depending on what is on your roof. Tap through — the failure patterns are genuinely distinct, and knowing yours narrows the search immediately.
Concrete tile roofs
The tile is a wearing surface, not the waterproofing — the self-adhered underlayment bonded to the deck beneath it is. That is why a tile roof can look perfect and still leak, and why a cracked tile may not produce a drip for a year, until the membrane it exposed finally gives up. Individual tiles can be replaced, and mortar at hips and ridges is a routine repair.
How a Leak Is Properly Traced
A real diagnosis happens in two places, and the attic matters more than the roof. From below you can see where water has actually tracked — stains on the underside of the deck, rust trails on truss plates, darkened timber, damp insulation. Those marks point uphill to the entry.
From above, the roofer then checks the suspects in that zone: boots, valleys, flashings, cracked tile, edges, and any penetration added after the roof went on.
Where the trail is ambiguous, a controlled water test settles it — running water on one small area at a time, from the lowest point upward, with someone watching in the attic. It is slow and unglamorous, and it is how ambiguous leaks are actually solved rather than guessed at.
Interior evidence
Photograph the stain, note when it appears, and check whether it tracks with heavy rain, wind direction, or nothing obvious at all.
Attic inspection
Follow the water marks on the deck underside and framing uphill to find where the trail begins.
Roof inspection
Examine the suspects in that zone — boots, valleys, flashings, tile, edges, penetrations — rather than the area above the stain.
Confirm, then repair
Water-test if the trail is ambiguous, then repair the actual entry point and photograph it before and after.
What a Real Repair Includes
A repair is not a dab of material over a symptom. On a properly executed repair, the failed component comes out and a new one goes in, detailed the way the original should have been.
A failed pipe boot is removed and a new one installed, not wrapped in sealant. Corroded valley metal comes out. Separated flashing is replaced, not re-caulked. If nothing was physically removed, nothing was really repaired.
The surface is lifted back far enough to see the condition of the waterproofing layer around the failure. That is what tells you whether this is an isolated repair or the first sign of a roof at the end of its life.
Plywood that has been wet repeatedly is soft and holds no fastener. It gets cut out and replaced. Roofing over soft decking guarantees the repair fails.
New underlayment and flashings have to be compatible with what they are bonding to. Mixing incompatible products is a common cause of repairs that fail within a season.
Dated photographs before, during, and after. That record is what supports an insurance claim, satisfies a future buyer’s inspector, and proves the repair if the leak ever recurs.
A repair should carry a written workmanship warranty. If a contractor will not put one in writing, they are telling you what they expect to happen.
How to Spot a Patch Job
Sealant used as flashing. Black or grey mastic smeared along a wall line, around a boot, or across a valley. It hardens and cracks within a few seasons. Sealant belongs in joints as a secondary defence, never as the waterproofing itself.
This started as one damp patch near a window.
Here is a tile roof repair on a Broward County home, start to finish, in our own photographs. We’re showing you this because it answers the question every homeowner asks — why can’t you just tell me the price over the phone? Look at the fourth photo and you’ll see why.
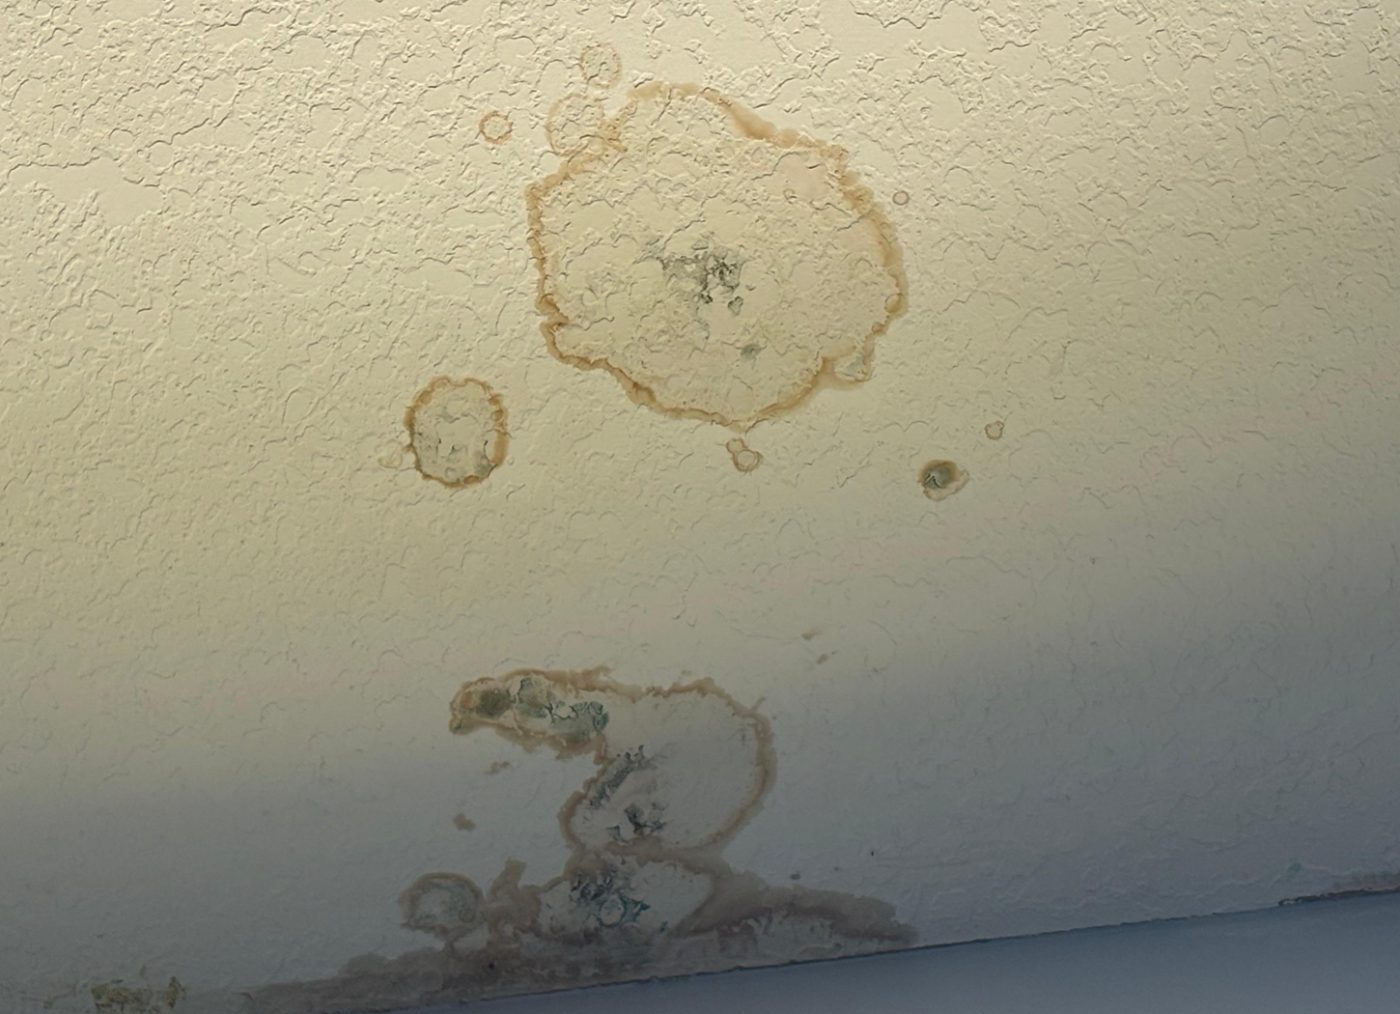
What the homeowner saw. A brown ring on the ceiling near a window, with grey-green spotting starting at the wall line. This is the whole reason they called — and the wet area above a stain is always larger than the stain itself.
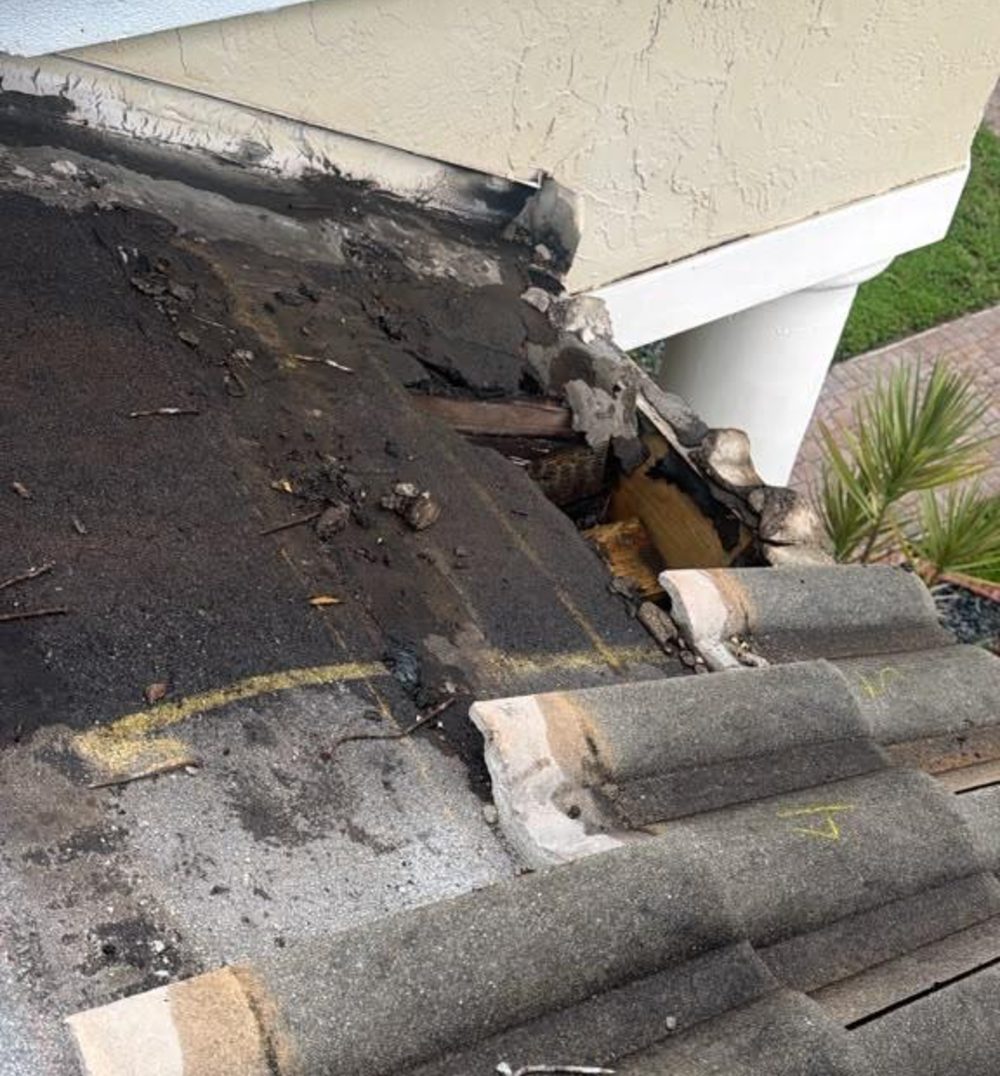
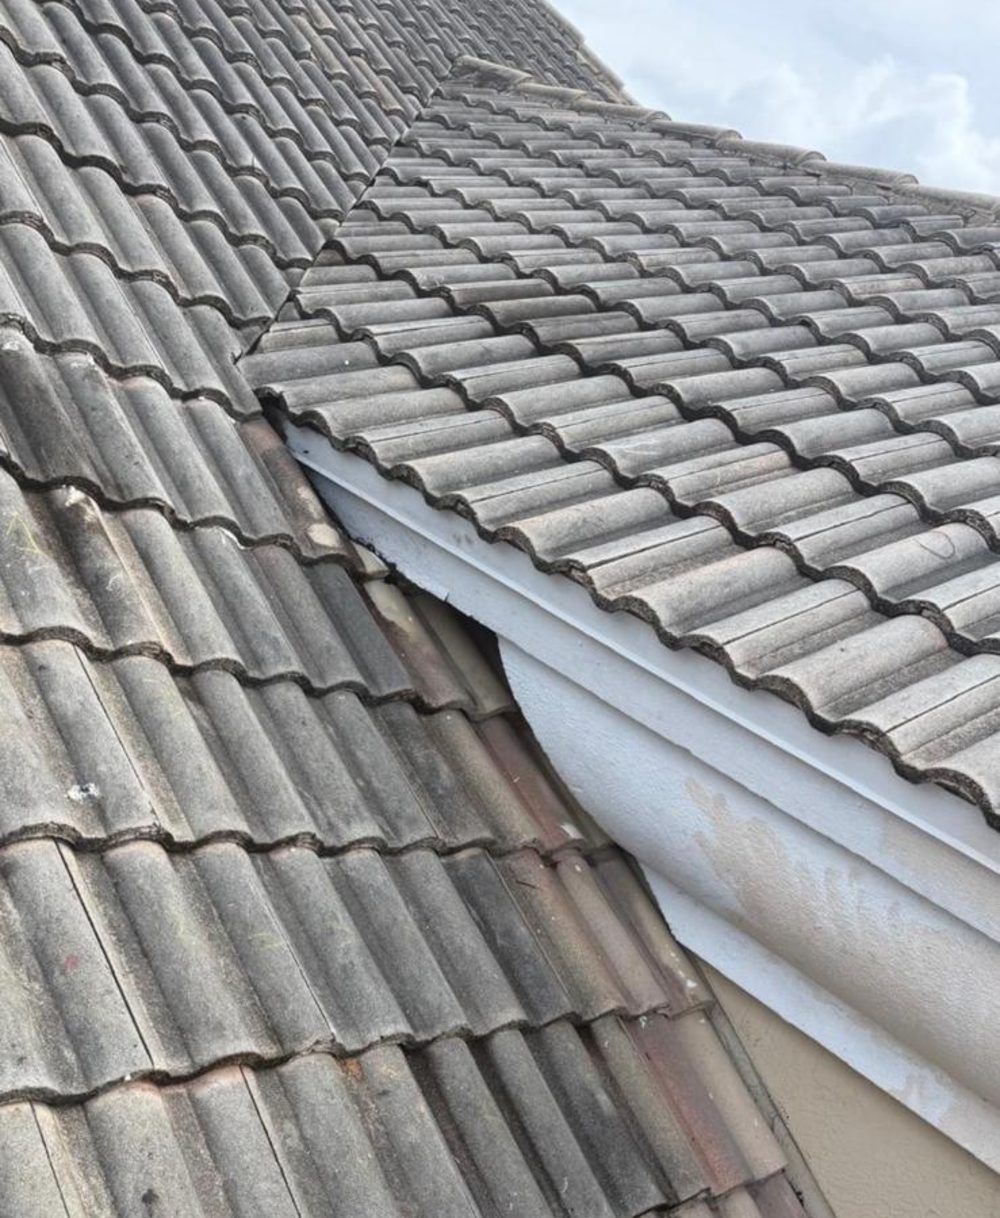
Outside, directly above it. The fascia had opened up at the tile line, with old sealant failing along the whole termination. Water had been getting in here long before it reached the ceiling.
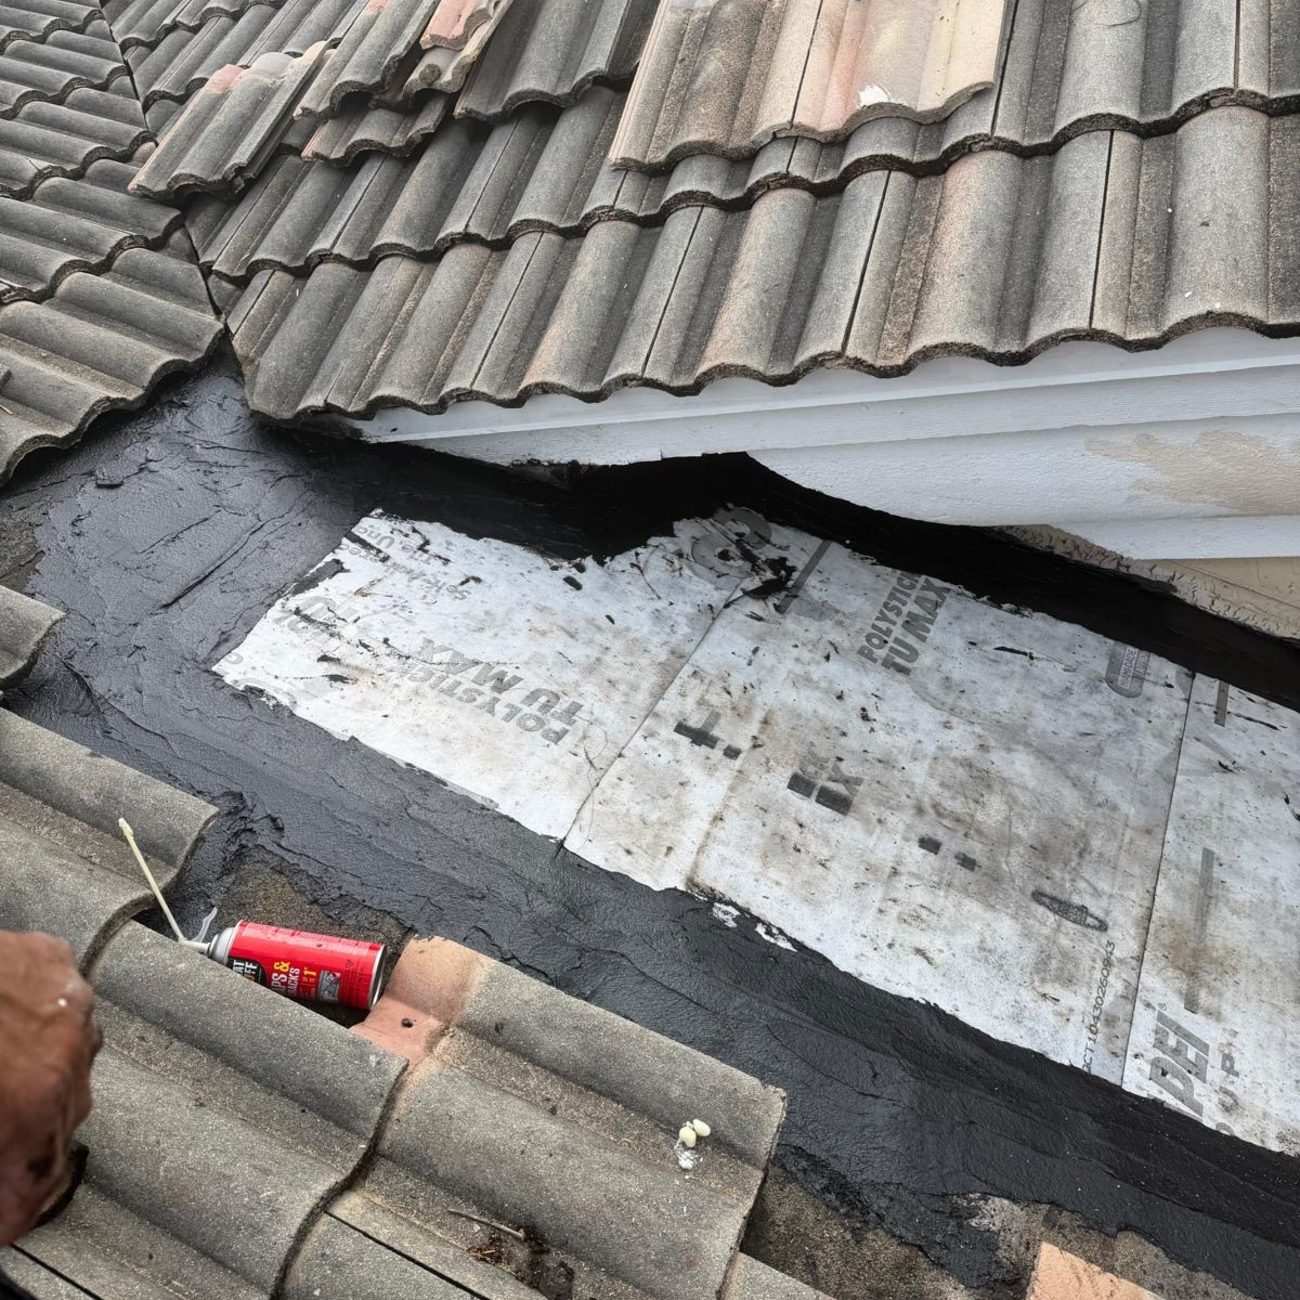
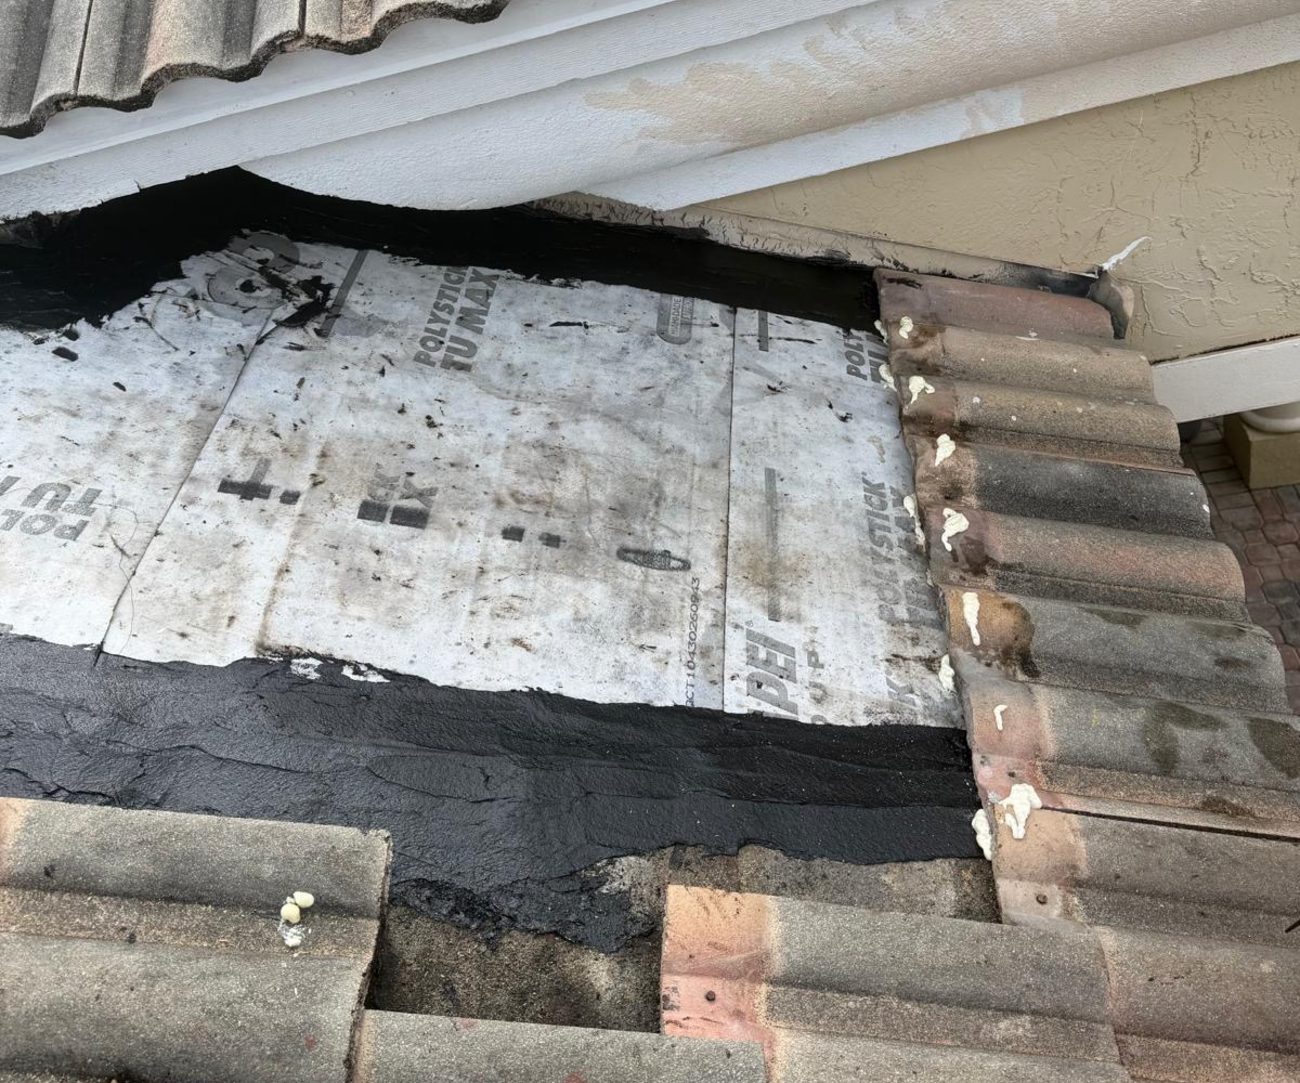
Marked and lifted. Tiles are numbered before removal so the original tiles go back in the same courses. Underneath: weathered underlayment, mastic patching, and an open edge at the fascia.
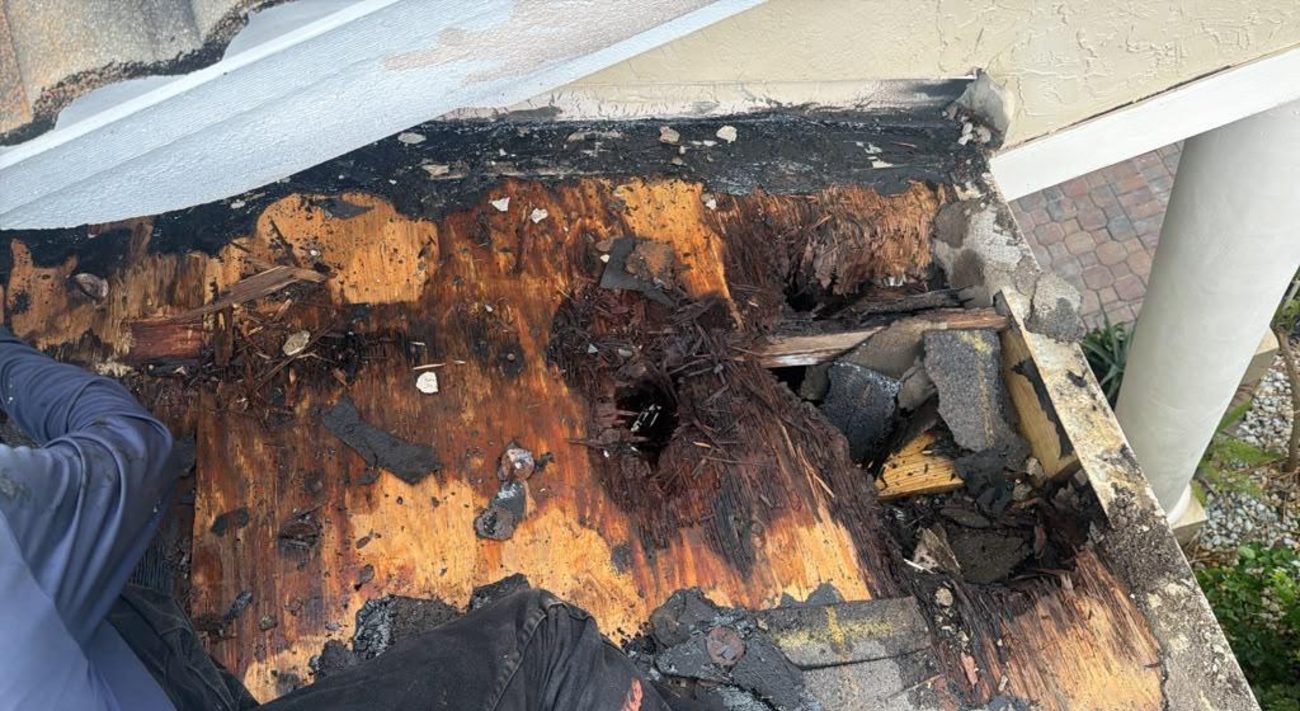
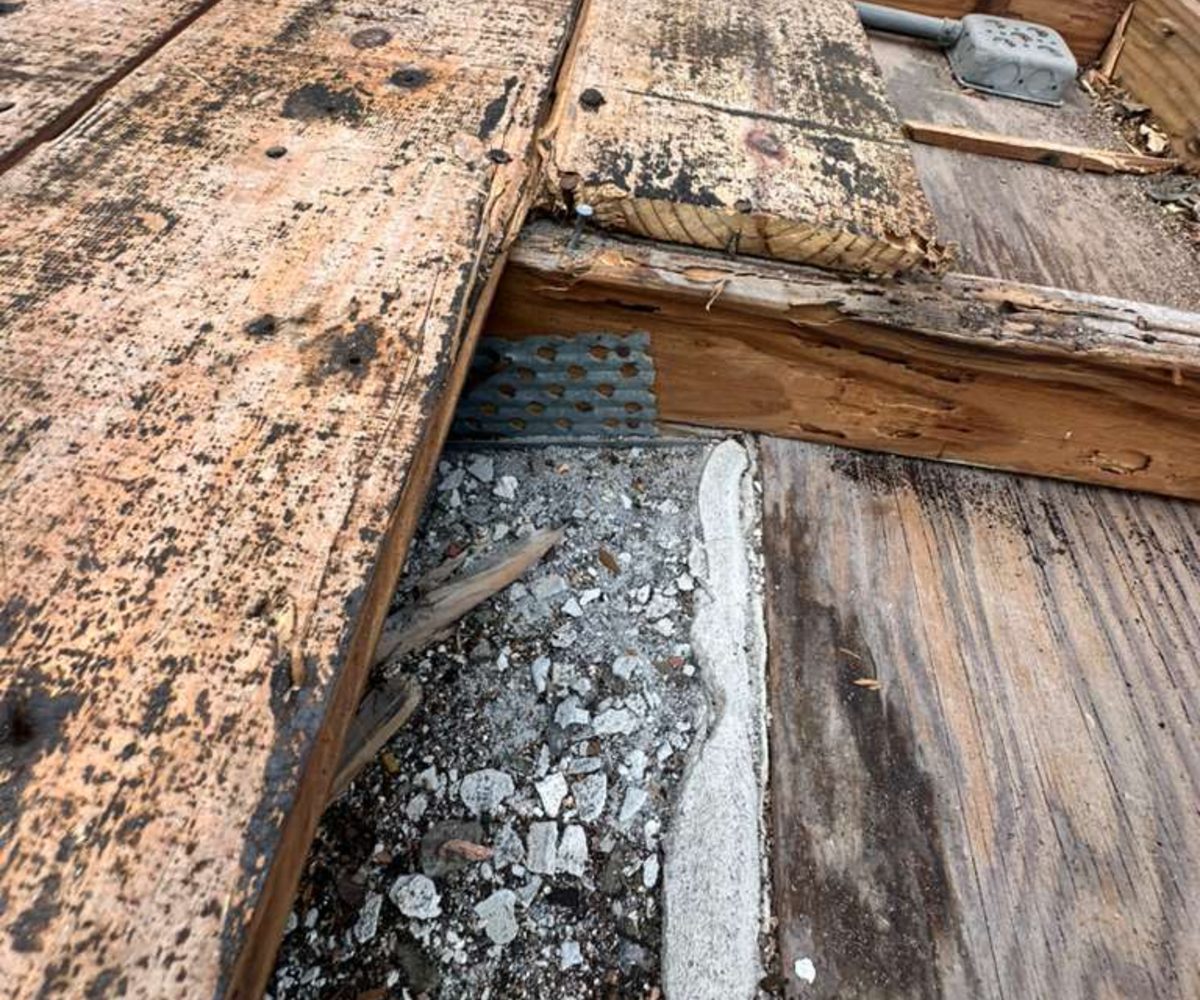
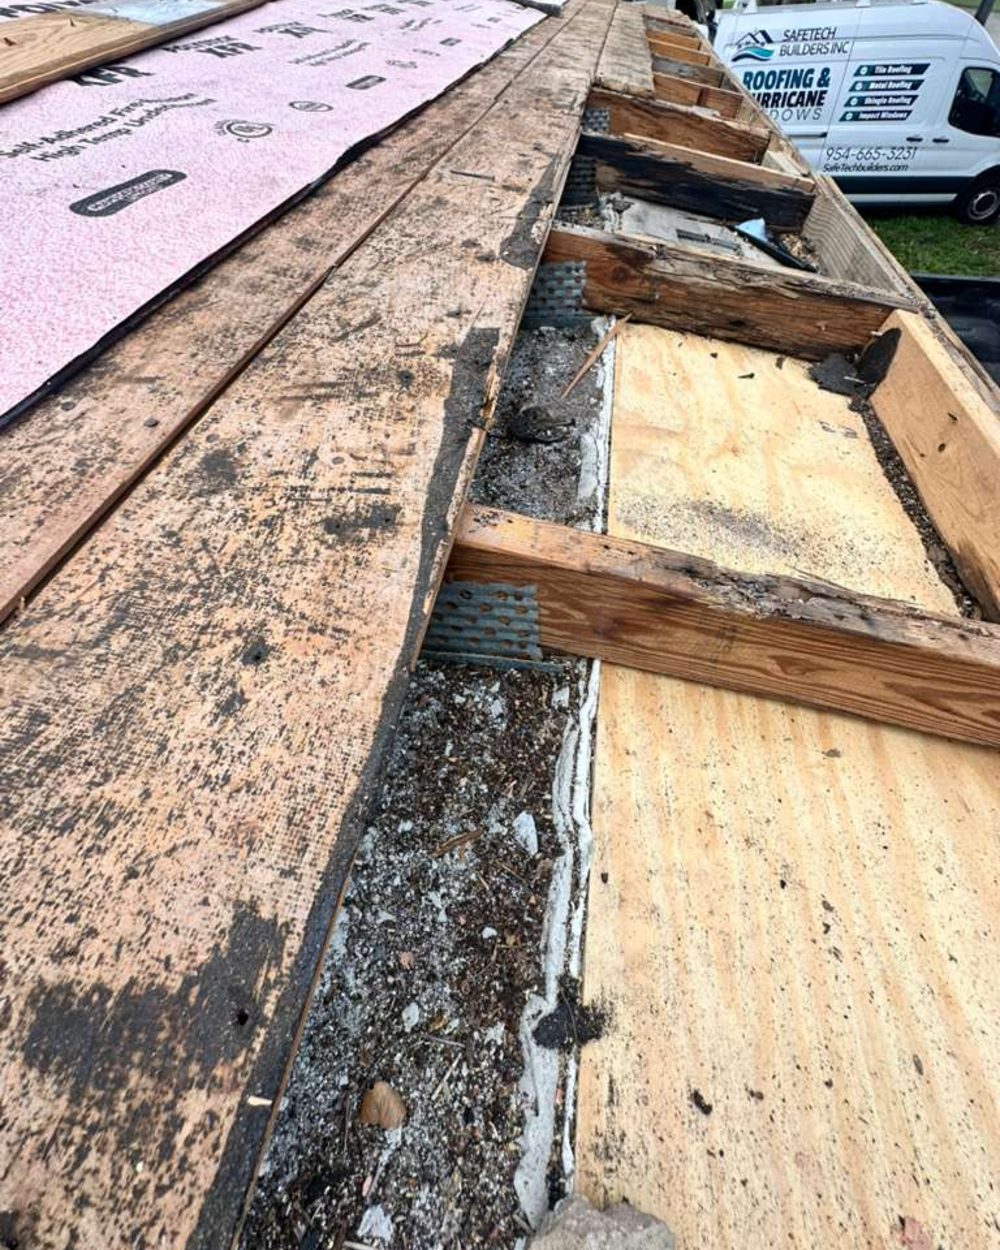
This is why we don’t quote over the phone. The plywood decking had rotted through in several places — holes you can see daylight through. None of this was visible until the tile came off.
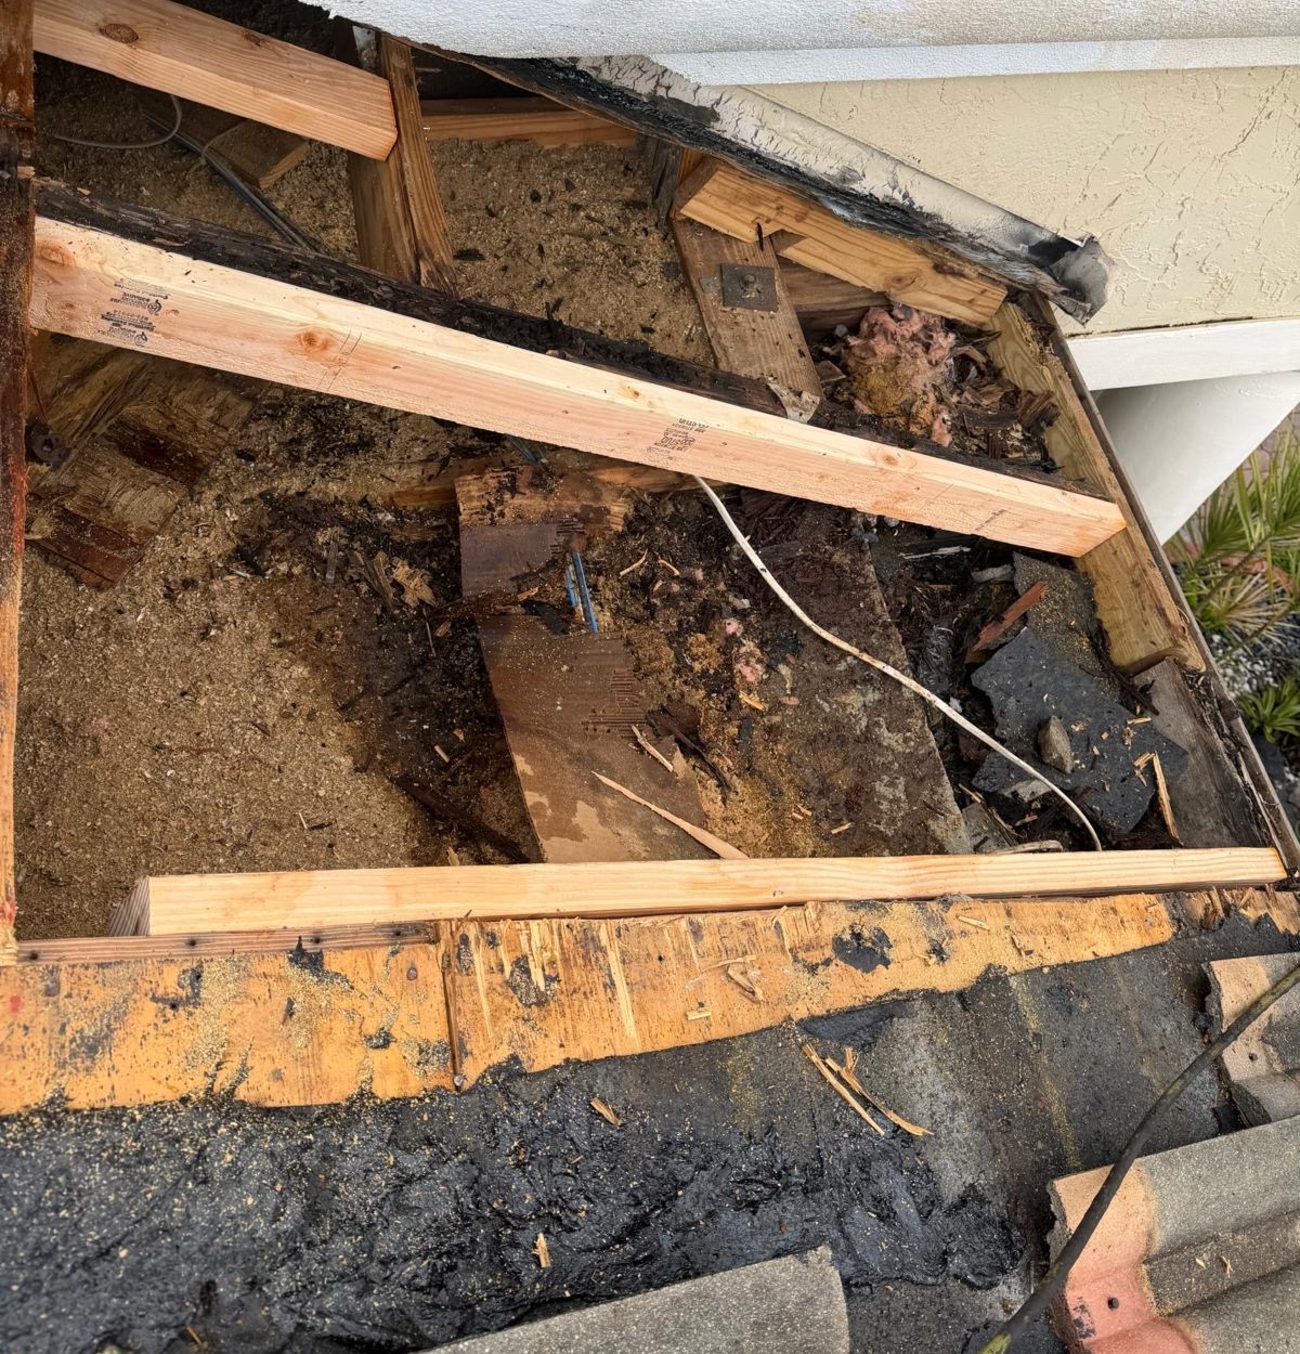
Down to the framing. The rot had reached the structure. New lumber goes in alongside the sound members — this is structural work, which is why we hold a General Contractor licence as well as a roofing one.
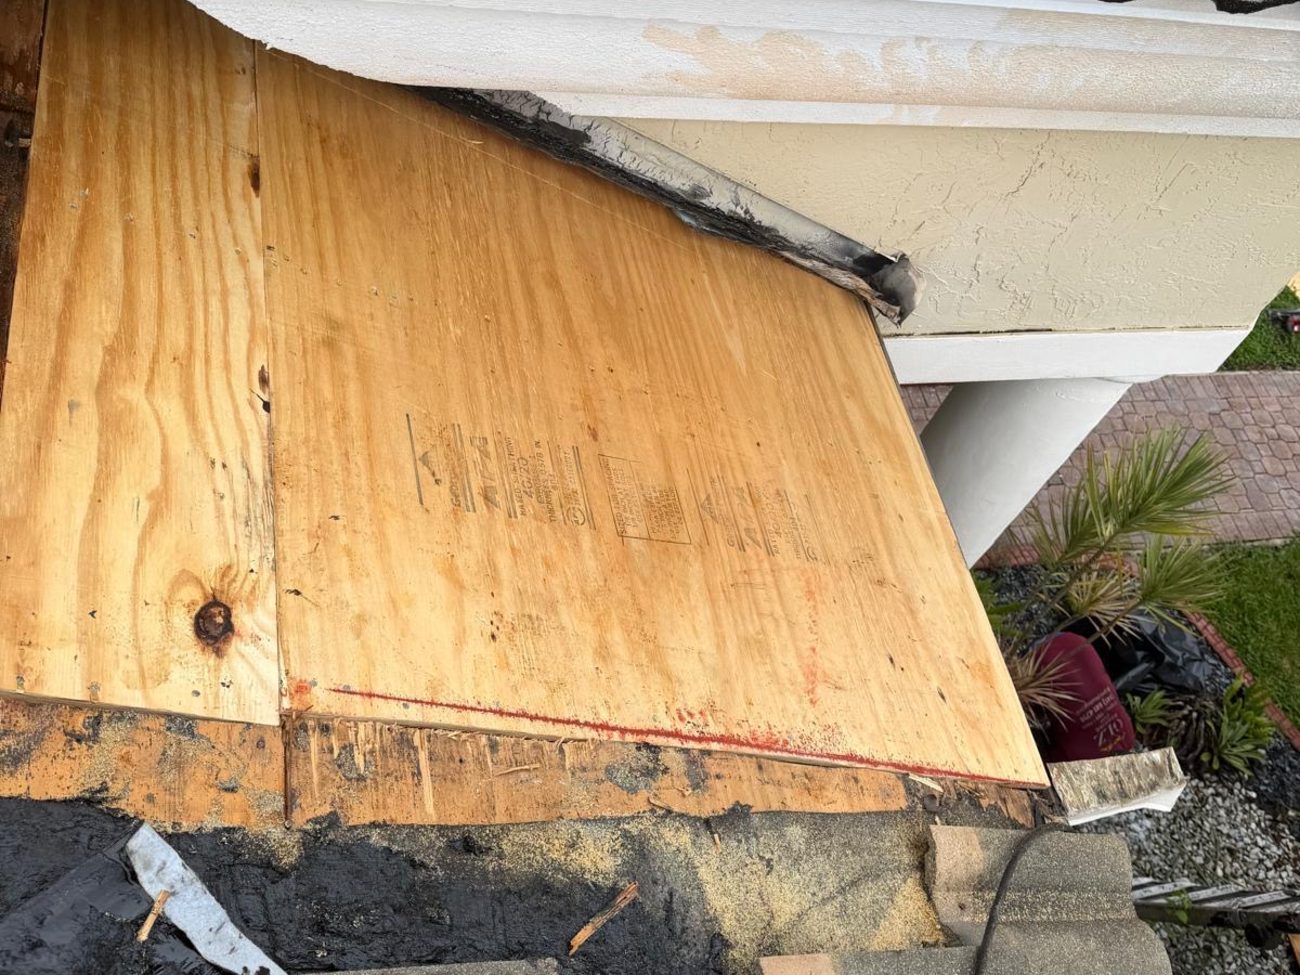
New decking. CDX plywood, code minimum 19/32in, nailed 6in on-centre at the panel edges. The red line marks the cut back to sound material.
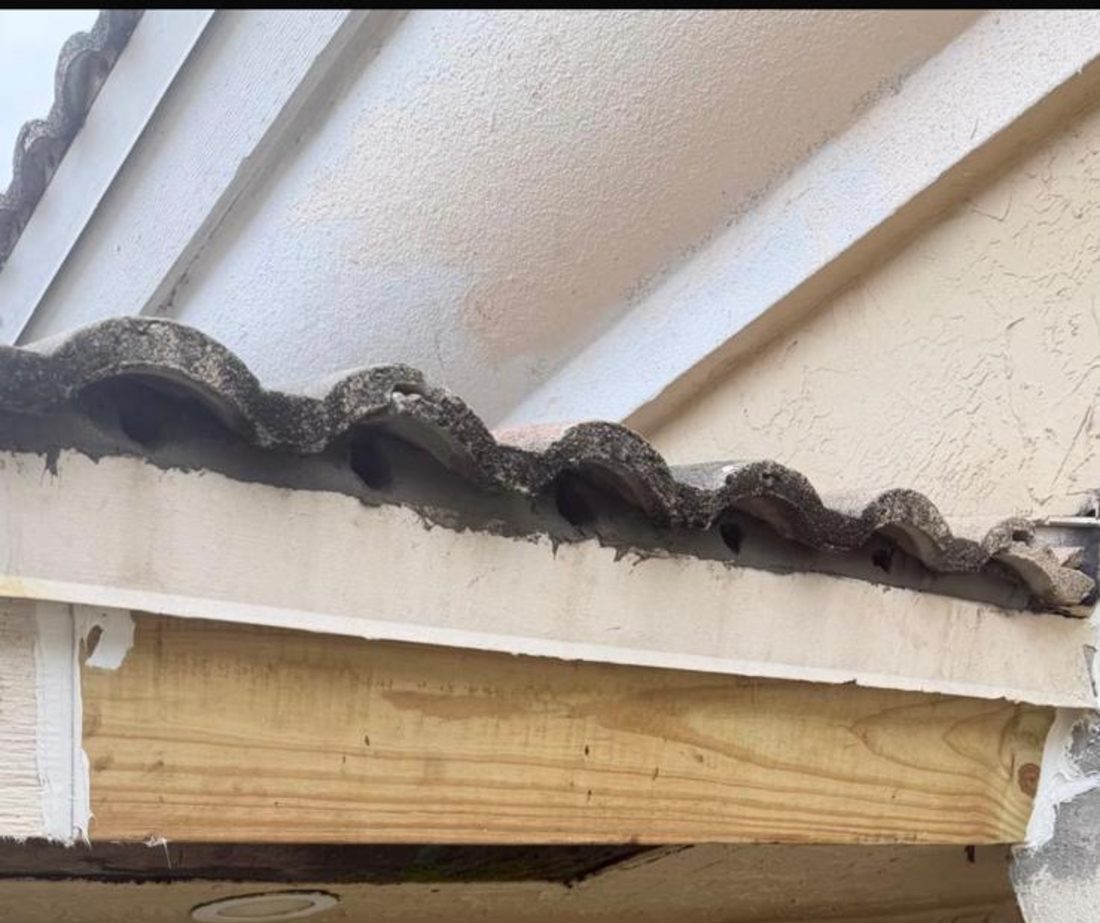
The eave that started it, rebuilt. New fascia and drip edge — sound timber, closed at the tile line, sealed behind the underlayment. Replace the roof and leave the fascia rotten and you have fixed nothing.
When Repair Stops Being the Right Answer
Most leaks are repairs. Some are the first honest signal that a roof has reached the end. Three things separate the two, and a decent contractor will show you which one you are looking at.
There is a point where repairs stop being the cheaper option. Three or four repairs on a roof with a few years left in it can cost a meaningful share of a replacement, and none of that money buys you a warranty, an insurance credit, or a secondary water barrier.
FAQs
Why is my ceiling stain not directly under the leak? +
How do you actually find where a leak is coming from? +
What is the most common cause of a roof leak in South Florida? +
Is roof sealant or mastic ever an acceptable repair? +
How do I know if a repair was done properly? +
When does a leak mean I need a whole new roof? +
Can a leak be repaired while it is still raining? +
Will my insurance cover a roof leak? +
Should I go up on the roof to look for the leak myself? +
How much does a roof leak repair cost? +
Ceiling stain or active leak? Free inspection with photographs — 24/7 emergency response.